Coinsights #15: Let's Stake $SOL
Happy new year!
A few people have asked for advice on getting involved with web3 in a tangible way. There are new projects and communities popping up daily, and it can be overwhelming deciding where to start.
This article gives concrete steps on how to start participating in the web3 ecosystem. More specifically, we’ll go over staking, and how to stake the $SOL cryptocurrency with just a few clicks. After going through the tutorial below, you’ll officially be a part of the web3 ecosystem!
For the people already deep into the crypto world, this article is a call to action. What parts of the process described below can be improved? How can we make the onboarding experience so simple such that articles like this don’t need to be written?
Let’s get started.
Note: this article is fairly image heavy, so I recommend reading it directly on Substack.
What is Staking?
Staking is a low effort way to have your crypto passively earn more crypto.
Essentially, staking allows you to earn cryptocurrency while also contributing to the overall health of the blockchain you choose to stake on. A common theme of web3 is interest alignment, and it’s true here as well: as you stake more crypto, the health of the network improves, which in turn makes your crypto more valuable! Staking is available on blockchains that use the proof-of-stake consensus algorithm. You can read more about proof-of-stake here, but the high level is:
Since blockchains are decentralized, independent validators must work together and decide which transactions to include in the transaction log
Validators must offer collateral (a stake) which is taken from them if they act maliciously
Validators earn rewards for acting correctly (rewards are in the same currency of the proof-of-stake blockchain they’re helping validate)
The larger a validator’s stake is, the more likely they are to be chosen to validate a set of transactions & therefore earn rewards.
However, you don’t need to be an official validator to participate in the proof-of-stake consensus system. Instead, you can contribute some of your crypto to a validator’s stake as a delegator and in exchange the validator will give you a proportional share of the rewards.
If you’re more of a visual learner, check out my Figma skills:
Many blockchains today use proof-of-stake as a consensus mechanism. The notable exceptions are Bitcoin and Ethereum, which both use proof-of-work.
Buying Crypto
Alright, enough theory, let’s get to the good stuff! The first step is to buy some $SOL. I recommend using an exchange like Coinbase Pro. It’s a slightly more complicated user interface than regular Coinbase, but it takes a smaller transaction fee. If Coinbase isn’t available in your country, use Binance or FTX. The screenshots in this tutorial will be for Coinbase, but similar concepts exist on all exchanges.
First, deposit USD (or another fiat currency, depending on where you are) into your exchange account.
Then, buy some $SOL, the native currency of the Solana blockchain. To complete this tutorial, please buy at least $10 USD worth of $SOL. Only buy what you’re willing to lose! $SOL is an investment and its price can fluctuate just like a public stock!
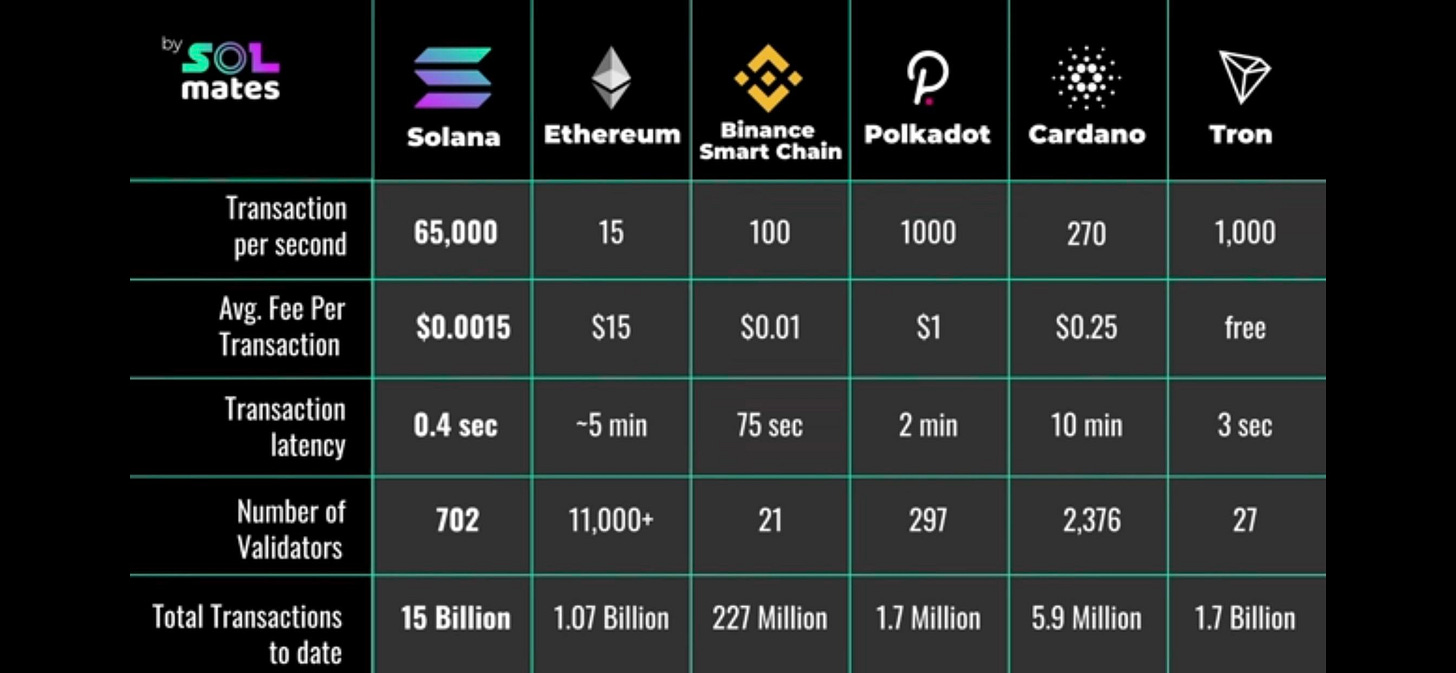
For context, Solana is a layer 1 blockchain with a $55B USD market cap, making it the 5th most popular cryptocurrency by that metric. Solana can support up to 55k transactions per second at fractions of a penny, making it an increasingly popular choice for developers. I wrote a few days ago about why I’m bullish on $SOL.
Staking $SOL
Now that you own $SOL, let’s start earning some more! First, get a Phantom Wallet account.
A wallet provides a way to securely store, receive, and send cryptocurrencies. There are many different kinds of wallets, which you can read about here.
Please create a strong password and store your seed phrase in a secure place! I recommend using a password manager like 1Password.
Once you’ve created a Phantom wallet, transfer the $SOL from the exchange you bought it on and deposit it into your Phantom Wallet. To do so, first make sure you’re using the “Mainnet beta” network in the wallet. The other options are for developers to test their code before dealing with real money on the Mainnet.
Second, withdraw the $SOL to your Phantom Wallet address.
After a minute or so, you should see an updated $SOL balance in your Phantom Wallet. You’re now ready to stake! Follow this blog post. I’ve added some pictures below that mirror steps 2-5 of the post to help you follow along.
I’ve personally staked with the validator Certus One due to its already large stake and number of delegators, but feel free to choose any option from the list. Two things to note when staking:
You cannot trade staked $SOL until you unstake it
The validator you choose to stake with does not own your $SOL. You can unstake at anytime and receive your $SOL back, minus the Solana transaction fee
Once you’ve completed the above steps, you’re all set! You should start seeing rewards in a week or so, which will look like:
Congrats on staking $SOL! If this is your first “web3 experience,” welcome to the community! 🥳 You now play a vital part in sustaining the crypto ecosystem. Get your friends too involved by sharing this post! The more people that buy and stake $SOL, the more everybody wins.
If you feel unsure about any step, please don’t hesitate to reach out in the Discord or directly on Twitter. I’m happy to help!
Was this article clear? Should I write more web3 tutorials? I’d love to hear your feedback!


